Friday, July 15, 2011

How to: Set Up a Mumble Server

VoIP is a effective way of communication in any game, whether it be a shooter or a strategy game, and Mumble is a great VoIP application.  There are many sites out there that offer hosting for a Mumble server, but today I'll be teaching you how to set up your own for free!

First, you need to forward your router's ports.  The steps for doing this vary depending on your router, and you should be able to find the intructions for your router on Google. For this tutorial, I will demonstrate using a Netgear wireless router, but the steps should be similar for most routers.

Step One: Find your local IP for your computer by going Start -> All Programs -> Accessories -> Command Prompt.  In the black box that appears, type (minus quotes)"ipconfig /all".  Find somethig that looks like this:

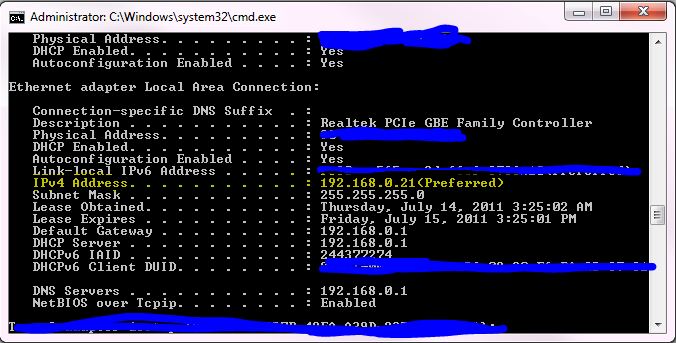
Look for your IPv4 Address.


Write down that number.  In my case, it would be 192.168.0.21.

Step Two: Access your router by typing in 192.168.0.1 in your browser.  The user/pass by default are typically User: admin Password: password.  You will be looking for something that says Port Forwarding.  Click on that to open up your port forwarding page.  Look for something that says "Add Custom Service", and click on it.  In the page that opens, set your settings to something like this:

Service Name: Mumble Server (doesn't really matter what you call it)
Protocol: TCP/UDP
Starting Port: 64738 (this port is the one that mumble servers use by default)
Ending Port: 64738
Server IP Address: the IP you found in Step 1 (in my case, 192.168.0.21)

You will need to set your settings similar to this.


Once you have put all that in, click apply.  You should see your settings have been updated, and port 64738 open.  You can check if your ports are forwarded correctly by going to http://canyouseeme.org/.

Step Three: Download and install mumble from here.  During installation, make sure Murmur (server) is set to install.  

Be sure that you are installing the server with Mumble.


When you are finished, go to C:\Program Files\Mumble (or whatever directory you installed Mumble to) and find a file called "murmur.ini."  Open the file using notepad. Here you will find the settings for your server.  A couple of notable lines:

#serverpassword=: This is used to set a password for your server, if desired.  Delete the # to use.
welcometext=: The welcome message for your server, in XML format.

Change your settings to what you like, and then save the file.  Then, run murmur.exe.  You should be able to access your server by opening mumble, and connecting to it through LAN.

You now have your own Mumble Server!


Congratulations!  You now have your very own Mumble server! If your ports are forwarded correctly, your friends can connect to the server through your external IP, which can be found at http://www.whatismyip.com/.

Thank you for reading my Mumble Server tutorial.  If you want to set up an admin, or get more information on Mumble, go to http://mumble.sourceforge.net/ for up to date information.

Hope this helps!

Wednesday, July 13, 2011

Review: Eyefinity

My PC has had multiple monitors for a while, and I have always loved multi monitor gaming.  3600x1200 is a really fun experience, but most games don't have native settings for multiple monitors.  For the longest time, your only options were to buy a triple-head-2-go for a fairly large chunk of change, or not use the other monitors for your game.  Enter Eyefinity.

Just Cause 2 is a good game to showcase how awesome Eyefinity gaming is.

Eyefinity is a program that makes your computer believe that instead of two seperate monitors, you have one large monitor connected to your computer.  Setup is easier than almost every other multi-monitor application I've seen, and most games I've tried will stretch your game across all of your screens. Eyefinity gaming is best with shooters, sims, racing games, and RPGs.

I'm using 2 monitors, but Eyefinity supports up to 6 monitors
at the same time!


There are some limitations to this amazing technology, though.  First and foremost: you must have a ATI graphics card (sorry NVIDIA users!).  Second, if you want to use three monitors, you have to have a Display Port connected monitor (this, however, can be solved by getting a VGA/DVI to Display Port adapter from here).  Also, games that have native support for multiple monitors won't allow you to use any features that came with native support and instead will make your main screen larger (Supreme Commander 2 is a good example, you will have a larger main screen but no full-screen mini map on your other display).  Like always with multi-monitor gaming, in some games the UI will appear strange/distorted, and some will not load at all, but for the most part, games work just fine.

Overall, I think that multi-monitor gaming is a unique and exiting way to play your games, and it's never been easier to do it thanks to Eyefinity.  If you have the hardware to do it, it's something neat that you should definitely try out.

Well Hello There!

Hi!  I'm pokemonmegaman, and welcome to my video game blog!  I'm an avid gamer, and have been playing games for many years.  I normally play on the PC, but I play all genres of games, and I'll be using this blog to share my reviews, thoughts, and news about games, and hopefully I'll be able to fill this blog with new content every day!  From one uber gamer to the next, welcome, and may all your bullets (and swords, lasers, grappling hooks and the like) land true!